23 July 2013

More Latticy Goodness.....

I've been enjoying the free music that has been playing at various venues in Sheffield this weekend and had a lightbulb moment... why not extrude a poly surface along the edge of a control object instead of relying on the bevel from my previous lattice tool mel script..... I know right, live music really clears the old skull wallnut eh!

So, Lattice Tool 2.0 was born......


The GUI is very similar to that of Lattice Tool 1.04 but without the nodes option, that will be added later, and to be honest it provides a very similar function to the original release but it is a completely new script that works in a new way.

Lattice Tool 1.04 relied on the bevel and extrude tools to create the lattice mesh from the edges of the control object and Lattice Tool 2.0 creates the lattice edges by extruding a control circle along each edge on the object and supplying a NURBS sphere to each vertex (corner) on the control object.


Extruding surfaces along an edge is a good way to allow the new surface to follow any manipulation that may be applied to the initial object, this allowed for the scale function to be considered on the lattice as well as any non-additional manipulation to be applied without having to press the refresh button on the GUI.

The corners were a new challenge.... in order to get them to follow the control mesh I created a follicle which was placed at each vert on the control object and then the corner sphere was parent constrained to it. This is not so straight forward as it may appear as follicles are placed on a UV coordinate system rather than an XYZ system, working out how to do that was fun and also a new UV map needed to be created whenever new faces were made.


The option to keep the panes is still enabled and supplies the same refractive shader as Lattice Tool 1.04, this can obviously be adjusted or completely changed through the hypershade is required.

Here's a video guide to demonstrate the new tools functionality......


The reason I created this new script was to enable live updating of the lattice object as the control mesh was manipulated, it works a treat but there is a down side in the processing that is required to create a complex lattice in comparison to the bevel option in Lattice Tool 1.04... however this is balanced by the fact that Lattice Tool 2.0 creates a clean lattice regardless of the input mesh whereas 1.04 sometimes had problems due to the way that the bevel tool calculates.

In making Lattice Tool 2.0 I have been able to apply all of the understanding that I garnered from creating the previous available version of Lattice Tool and have, again, learned a shed load of new functionality under the hood of Maya... I love scripting!

CLICK FOR SCRIPT - Creative Crash

14 July 2013

Lattice Tool Evolution & Script...


So, after my last post I decided that the Lattice Tool would benefit from a couple of upgrades, more buttons and sliders in the UI.....


The "Nodes" check box toggles the creation of a sphere at each vertex point on the control object and when it is activated the "Node Scale" slider is also active and controls the size of the spheres.

The "Panes" check box stops the control object from being deleted when the "DONE" button is clicked, a glass style shader is also attached to the object... this can obviously be changed or adjusted if you want but I quite like the way it looks.

Here's a video demonstration of the Lattice Tool V 1.04 in action.....


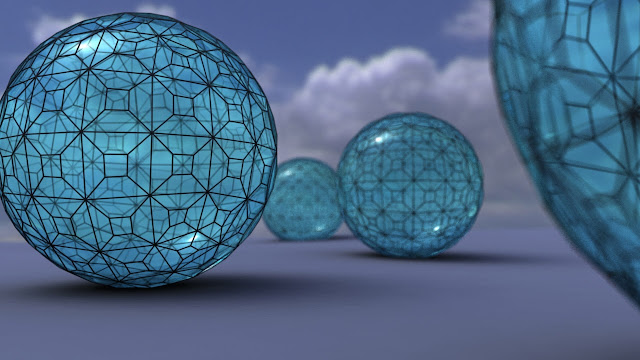
This render demonstrates the "Panes" option. The pale blue shader is created and applied to the control object upon completion of the tool, it's a simple Blinn with a refractive index of 1.4.


This has been an amazing learning experience for me. Having very little prior understanding of scripting I have been able to write this 350 line mel script, utilising all sorts of variables, functions and procedures, from scratch... and it works!!

It's certainly developed my understanding of Maya and opened up a whole new world of potential for future projects.

If you'd like to try the Lattice Tool script you can download it from here......

CLICK FOR SCRIPT - Creative Crash

10 July 2013

From Dirigibles to Lattice Tools....

After my previous posts I began to wonder what I could do next and I figured that a Zeppelin would be a cool thing to make with it's rigid skeletal structure and canvas outer... plenty of textures and materials that could interact with one another to produce some interesting simulation.

Anyway, I was thinking about how to make the rigid structure of the airship, not a particularly taxing modelling exercise but one that could be easier... something like the lattice modifier in 3DS Max would have been ideal but nothing like it exists in Maya 2013. Sure there's probably plenty of free plug ins that do the job but where's the fun in using something someone else has made when you can try and solve a problem yourself?

It was pretty straight forward to write a script that created a lattice from a poly object and it got more interesting when I decided to make the user interface for the tool, so many things to learn variables, procedures, arrays and all the other stuff that comes with programming.

I got there in the end and Lattice Tool 1.1 was born!


I'm pretty pleased by the fact that it works, there's always room for improvement, hence this being the second version and possibly not the last, but for now it gives the required results and is not confined to creating airship frameworks......


The object in the image wad created in seconds using the lattice tool on a sphere... well technically it was a smoothed cube but I'm not going to be pedantic about it! Anyway, I made the video below using many copies of the object, I'm not too sure what happened to the quality when it was compressed for Vimeo (they're usually great) but it looks a bit grainy.... oh well.


I still haven't made my airship but I'll get around to it soon enough.