16 November 2013

Rotoscoped Nightmares......

Ok, so no posts for a month and then two come along at the same time...... typical!

As well as attending BAF I have managed to do a bit of practical work this month in the shape of a rotoscope and stop motion animation... check it out!


Since my work is primarily computer based I've neglected my drawing skills over the past few years and decided to learn how to hold a pen again by rotoscoping the "here's Johnny" scene from The Shining.

The animation is approximately one minute long and I figured that, drawing at 12 frames per second, it would be manageable for me to finish the project in a fairly short period and get the hang of using a Wacom tablet again..... sitting down and drawing, how hard could that be?....

Man alive, the effort, both physical and mental, that was required to complete this was astonishing and was something that I never expected.

To begin with things were fine but then after a while the pain in my wrist and fingers began.... the best analogy I can come up with is having done no exercise for years and then running a half marathon, my body had become lazy and the muscles required to hold a pen were useless and ached for a couple of days after the initial drawing session.

The fitness in my hand soon caught up and after a short while drawing for lengthy periods wasn't too much of an issue but the concentration required was draining. Ensuring that straight lines on the frame I was working on matched those on the previous frame became stressful and the monotony of drawing the same thing over and over and over made me begin to hate my decision to start this project.

But, I had to finish it....There was no way that I was going to invest so much effort into something and leave it incomplete.... The fourth shot was the longest and was where my motivation really began to wain. It is a torturous process and one that has made me appreciate the work of traditional animators even more than I had previously.

The drawing did get finished and the stop motion for the note pad was very straight forward in comparison... although crumpling up over 600 pages of paper does actually hurt after a while.

I know it sound's like I hated making this work but I really didn't. I am truly pleased with the results but I simply wasn't prepared for the mental rigour that was required to get me through the project and, a few days after completion, I am already sure that I will undertake some more hand drawn animated projects in the near future.

20 Years of BAF....

It's been a month since my last post.... where did those 31 days go????

So, what have I been doing with my time..... well, apart from working and spending time with my family I spent this week at Bradford Animation Festival which was celebrating it's 20th anniversary.


Highlights of this years festival included a selection of inspiring animations from students and professionals around the world, masterclasses from Warren Spector, Dave McKean and Anna Pavlotova, industry presentations from Travellers Tales and Double Negative and interviews with Lee Hardcastle and McKinnen & Saunders.

It's been an really interesting week where I feel that the overall message has been one of preparation and pre-production. Providing that the initial ground work of a project is done prior to production then there is much less likelihood of it collapsing before completion.... I hope that all students who were present throughout the festival also got that message and will take the advice on board and apply it to their own practice.


17 October 2013

Tangled Times......

Once again it's been a few weeks since I've been writing in my blog but here I am again, yay, writing about stuff I've been working on since my last post.... as much as a reminder to myself of what I've been up to as it might be a document of interest to you, the reader.

So, what have I been doing?.....

Teaching and preparing to teach mainly but I have also been able to spend a bit of time working on a couple of personal projects too.... I imaging that you're wondering "what could these personal projects be?".... well there's one one that I don't want to talk about yet and another that I will happily share, hopefully satisfying your curiosity enough that you will forget about the project that I'm not willing to speak of right now.


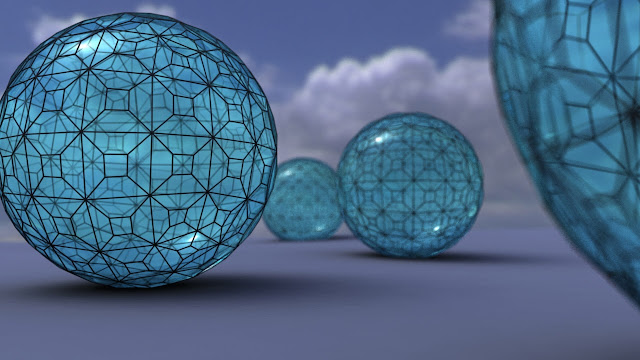
What you're looking at there is a product of the personal project that I'll be rattling on about in this post...... can you guess what it is yet?

You got it... my Lattice Modifier tool for Maya!!

Well, it's called the Super Lattice Modifier now and I think it's finished..... until someone suggests some other functionality that I may be able to apply through it to make it even more super.... perhaps even MEGA!!

I've made a whole bunch of changes to the tool and it's functionality and interface are now very different from the original version. Where previously I had used bevels and extrusions to create the lattice I now apply paint effects to the edges of the control object which allows for real time updating when geometry is added or adjusted making the whole process far more user friendly and efficient.

Watch the video to see how it works and stuff.......


Because I've used the docking function for the interface it makes the tool feel much more integrated within Maya, a part of it rather than a separate object that simply works along side it. I needed to develop my understanding of how to build a user interface with MEL and then ditch the old version and start from scratch with the new one to be able to dock it but it is totally worth it and I believe that the new method is in fact far more efficient than my old way........  formLayout (old way) Vs. frameLayout (new way) = no contest!

One of the big new features of the tool is the ablility to keep the original mesh that the lattice is based on, so if you have a textured object/character or whatever that you'd like a wire frame render of it's as simple as clicking a check box....... that image below was made in a matter of seconds with the script.


A more creative approach to using the tool can be seen below. This image was made using the new functions in the Lattice Control section. I used a Humster3D model of a Mini Cooper that came free on the front of one of my magazines and ran the Super Lattice Modifier twice over each of the main pieces of geometry. 


Obviously, running the script twice on any geometry will create a pretty heavy scene (a little over 4 million polygons in this case) but it's worth it and as I was saving the scene iteratively after each body part there was little possibility that the scene was going to die on me.

Needless to say, I'm pretty proud of the script I've written and although it utilises many functions that are already available within Maya it makes the workflow so much more efficient and puts all of the utilities under one user interface.

Download it and have a play.... you know you want to.......

DONLOAD HERE


16 September 2013

Miniature Big Bang......

Having avoided fluid dynamics for the last 11 years, I finally decided to find out how to use them to create explosive events, so I set myself a mini brief that would allow me to develop my skill set by applying a few new techniques in conjunction with some of my previous research.

The brief was pretty simple..... Blow Shit Up Using CGI.

But what to blow up..... well, I figured I'd start small and use a little cat ornament that my daughter made.


Now, it would be straight forward enough to model the cat using polygons in Maya but I figured this would be an ideal opportunity to try out something new in the shape of 123D Catch, a nifty free piece of software from Autodesk that will convert a series of photos into a 3D model.

123D Catch is pretty straight forward to use - Take a bunch of photos, upload them, wait a short while and then download your 3D object in whichever format you want. Providing you follow the instructions it's difficult to go wrong but first attempts can be forgiven..... check out porridge cat below


So, I tried again, got a mesh that I could work with and cleaned it up..... the initial output from 123D Catch will always have some imperfections, holes etc, and will also include the floor which needs to be removed. Below you can see the results of my capture as well as the horrible dense mesh that 123D Catch produces. 


While it's great that you can easily capture objects for rendering, they are pretty much useless for anything else - especially if you're thinking of running demolition simulations with them - due to the the density and topology of the mesh. So, bearing this in mind I figured that I could make a low poly proxy of the ornament, with a clean mesh that would play nicely with DMM, and use the high poly object to create a normal map to apply to the low poly version. This can be done very easily in Maya using the Transfer Maps function. Below are the fruits of my efforts....


While the low poly object is no where near as refined as the high poly version, it is clear that there are a whole bunch less faces and it's going to get blown up anyway and only one or two frames are going to be seen with this intact. If I had spent a bit more time making the proxy object I could have easily got a much better likeness.... same could be said for the 123D Catch exercise too.

With the mesh sorted I could now get on and destroy it using the DMM plugin for Maya. This is something I've used a lot in the past and I'm sure that I rambled on about it then, so won't go into exactly how I set up the scene in this post.... suffice to say it got exploded nicely! One thing I will mention though is that I wanted this small object to blow up like a massive object and as DMM works to real world scale I had to scale the cat up quite a bit.

So onto the fluids..... what can I say.... they're as straight forward as they can be considering what is possible with them but they're still not that straight forward.

Maya fluids have an enormous array of settings that can be adjusted to create reactions and interactions between emitted fluids. The fluids can only be present within "containers" that are placed within a scene but any number of containers and emitters can be created.

Without some reference I wouldn't have a hope of understanding the processes involved in using fluids but there's an awesome guide on Digital Tutors that helps a lot with understanding process alongside reading the manual!

One thing that is important to note is the time that fluid simulations can take and the size of the cached simulations. I have 4 cached simulations in my scene (explosion, fire chunks, cat shards, flames on cat shards) and the project folder is 61.4 gigabytes..... good job I've got a bunch of 3 1/2 inch hard drives and a hot swap dock is all I'm saying!

Once I had worked through the DT guide I used what I learnt to create the explosion for my cat ornament, there's two fluid simulations here, one for the explosion and one for the flaming chunks. I also applied fire to the pieces of cat for a bit more oomph... I think that's the technical term. Here's the rendered sequence......


I only ran one render pass here rather than breaking it down into it's various components which would allow for greater control in post production. Now that I understand the processes involved in creating a nice explosion I can and will do the passes in future. I also added a bit of camera shake in After Effects and some audio that I put together using downloaded clips from freesound.org in order to further "sell" the effect.

I'll be making another explosion next but will be compositing it onto some hand held footage... another process to add to this complex shot!

26 August 2013

Go Go Turbo Lens,,,,,,

In a break from my usual ramblings about CGI, I bought a new toy for my camera the other week and figured I'd write about it because a) it's pretty neat and b) it does tie in with my CGI work in a way as I use this camera for all of the live action in my composite testing & experiments.

The new toy I mentioned is a "Lens Turbo" from Zhongyi, not one of the best known manufacturers of camera optics in the world but hey, they had a neat idea and got to market with a competitive product that caught my eye.


The Lens Turbo is an adapter that converts the e-mount fitting on my NEX 5N to M42 thread mount which means that I can attach old, well built, manual m42 lenses to my camera body and reap the benefits of using quality glass at a fraction of the cost.

Now, I've been using various adapters for my 5N since I got the body but the difference with the Lens Turbo is that it is not a simple tube like my other "dumb" adapters but has it's own optics which lessens the crop factor of the sensor in the camera.

OK, so I should probably explain crop factor now.......

Most lenses are built with 35mm film in mind, this means that the light is focussed down to the approximate area of a frame of 35mm film or a full frame sensor in a digital camera (36 x 24mm). So if you're using the lens on a camera with a smaller than full frame sensor it will result in the image being cropped because only the light that hits the sensor is processed.

The image above illustrates crop factor nicely. The blue rectangle is equivalent to the size a full frame sensor or 35mm film and the black rectangle is equivalent to the APS-C sensor in my NEX 5N, which has an approximate crop of 1.5 meaning that a full frame sensor is about one and a half times it's size. 

The white area represents the light that is cast by any lens and the grey area represents the light which is processed by my crop sensor for that lens. It's easy to deduce from the image that the field of view has been drastically reduced and that, while it would be possible to get the same field of view by taking a picture from a position further back, the depth of field in the shot would be affected as the lens would need to be refocussed.

The Lens Turbo refocusses the light from any attached lens onto the area of the APS-C sensor in my camera reducing the crop factor to a negligible amount. In some tests in which I compared a 50mm lens on one of the full frame Canon 5D mkIII's at work against my 50mm Super Takumar with the Lens Turbo the crop factor was reduced to approximately 1.08 which is a significant step up from the original 1.5.

The two images in this GIF were shot in my local park from the same spot on a tripod, and using the same 50mm lens. One with the dumb adapter and the other with the Lens Turbo, I scaled the dumb adapter image down to better illustrate the crop.......


The images were shot in wide screen format as I usually use my camera for video work and forgot to change the settings but as this is simply a demonstration of the adjusted field of view that the Lens Turbo offers, and not an entry in a photography competition I figured it would be ok in this case.

Another benefit of the Lens Turbo is that because more light is focussed onto the sensor the aperture is effectively reduced by nearly a whole stop so my 1:1.4 50mm Super Takumar is opened up to about 1:0.4 which means that I can use faster film speeds in lower light and reduce noise on the image.

So far, I've been really impressed by the Lens Turbo. I think that a professional photographer or film maker would be less happy with images that have been taken using one of these adapters but as I am neither I am more than happy with the results and it would cost much more than the price of my camera body and the Lens Turbo to buy even an old full frame sensor body.

25 August 2013

Off to the Orient......

So, it's been a while since my last posting..... school holidays, kids to entertain, general chill out and a multitude other things have meant that personal projects have been put on hold for the past few weeks.

That said, stuff has been going on....

It's difficult to not to notice that my last few posts have centred on lattice creation.... I have since created my ultimate lattice tool.... well ultimate for now and until inspiration breeds something new. Anyway, it's great and I'll get it onto Creative Crash, make a demo video and write a post all about that later.

I've also got shiny new camera stuff in the shape of a focal reducer... a focal what??... you heard me, a focal reducer... I'll let you into what that does in another post that I have planned for the very near future but the aim of this particular post is not to focus on focal reducers.

I got some great news the other day about my Shadow & Light animation, it got selected for SIGGRAPH Asia this year and will be presented as part of their Computer Animation Festival in Hong Kong.


I've been blown away by the popularity and success of this little animation, and I might also add a little perplexed!

Yes there is 3 months worth of research and development that went into my being able to make the film but the final product was initially made very quickly for a local event and I figured that would be the end of it, but it has since been shown at Animex, SIGGRAPH and now SIGGRAPH Asia so how did that happen....?

I guess a lot of it has to do with the fact that I submitted my work in the first place, I was brought up with the saying "shy bairns get nowt" instilled in my conscience and it has worked in my favour in this case but why this particular animation? What is it about Shadow & Light that people like?

I really have no idea.... perhaps it's a zeitgeist thing, I may have inadvertently created something that aligns with what people want to look at or can empathise with at this current time... I normally deal with narrative and don't really understand art so when I make an "art" piece that becomes popular, of course I'd like to be able to do it again but, as I don't truly understand what I've done....... well, you get where I'm coming from.

Whatever the reasons I'm well chuffed that it's getting presented on these international stages and is being shown in amongst some truly amazing and inspiring work.

23 July 2013

More Latticy Goodness.....

I've been enjoying the free music that has been playing at various venues in Sheffield this weekend and had a lightbulb moment... why not extrude a poly surface along the edge of a control object instead of relying on the bevel from my previous lattice tool mel script..... I know right, live music really clears the old skull wallnut eh!

So, Lattice Tool 2.0 was born......


The GUI is very similar to that of Lattice Tool 1.04 but without the nodes option, that will be added later, and to be honest it provides a very similar function to the original release but it is a completely new script that works in a new way.

Lattice Tool 1.04 relied on the bevel and extrude tools to create the lattice mesh from the edges of the control object and Lattice Tool 2.0 creates the lattice edges by extruding a control circle along each edge on the object and supplying a NURBS sphere to each vertex (corner) on the control object.


Extruding surfaces along an edge is a good way to allow the new surface to follow any manipulation that may be applied to the initial object, this allowed for the scale function to be considered on the lattice as well as any non-additional manipulation to be applied without having to press the refresh button on the GUI.

The corners were a new challenge.... in order to get them to follow the control mesh I created a follicle which was placed at each vert on the control object and then the corner sphere was parent constrained to it. This is not so straight forward as it may appear as follicles are placed on a UV coordinate system rather than an XYZ system, working out how to do that was fun and also a new UV map needed to be created whenever new faces were made.


The option to keep the panes is still enabled and supplies the same refractive shader as Lattice Tool 1.04, this can obviously be adjusted or completely changed through the hypershade is required.

Here's a video guide to demonstrate the new tools functionality......


The reason I created this new script was to enable live updating of the lattice object as the control mesh was manipulated, it works a treat but there is a down side in the processing that is required to create a complex lattice in comparison to the bevel option in Lattice Tool 1.04... however this is balanced by the fact that Lattice Tool 2.0 creates a clean lattice regardless of the input mesh whereas 1.04 sometimes had problems due to the way that the bevel tool calculates.

In making Lattice Tool 2.0 I have been able to apply all of the understanding that I garnered from creating the previous available version of Lattice Tool and have, again, learned a shed load of new functionality under the hood of Maya... I love scripting!

CLICK FOR SCRIPT - Creative Crash

14 July 2013

Lattice Tool Evolution & Script...


So, after my last post I decided that the Lattice Tool would benefit from a couple of upgrades, more buttons and sliders in the UI.....


The "Nodes" check box toggles the creation of a sphere at each vertex point on the control object and when it is activated the "Node Scale" slider is also active and controls the size of the spheres.

The "Panes" check box stops the control object from being deleted when the "DONE" button is clicked, a glass style shader is also attached to the object... this can obviously be changed or adjusted if you want but I quite like the way it looks.

Here's a video demonstration of the Lattice Tool V 1.04 in action.....


This render demonstrates the "Panes" option. The pale blue shader is created and applied to the control object upon completion of the tool, it's a simple Blinn with a refractive index of 1.4.


This has been an amazing learning experience for me. Having very little prior understanding of scripting I have been able to write this 350 line mel script, utilising all sorts of variables, functions and procedures, from scratch... and it works!!

It's certainly developed my understanding of Maya and opened up a whole new world of potential for future projects.

If you'd like to try the Lattice Tool script you can download it from here......

CLICK FOR SCRIPT - Creative Crash

10 July 2013

From Dirigibles to Lattice Tools....

After my previous posts I began to wonder what I could do next and I figured that a Zeppelin would be a cool thing to make with it's rigid skeletal structure and canvas outer... plenty of textures and materials that could interact with one another to produce some interesting simulation.

Anyway, I was thinking about how to make the rigid structure of the airship, not a particularly taxing modelling exercise but one that could be easier... something like the lattice modifier in 3DS Max would have been ideal but nothing like it exists in Maya 2013. Sure there's probably plenty of free plug ins that do the job but where's the fun in using something someone else has made when you can try and solve a problem yourself?

It was pretty straight forward to write a script that created a lattice from a poly object and it got more interesting when I decided to make the user interface for the tool, so many things to learn variables, procedures, arrays and all the other stuff that comes with programming.

I got there in the end and Lattice Tool 1.1 was born!


I'm pretty pleased by the fact that it works, there's always room for improvement, hence this being the second version and possibly not the last, but for now it gives the required results and is not confined to creating airship frameworks......


The object in the image wad created in seconds using the lattice tool on a sphere... well technically it was a smoothed cube but I'm not going to be pedantic about it! Anyway, I made the video below using many copies of the object, I'm not too sure what happened to the quality when it was compressed for Vimeo (they're usually great) but it looks a bit grainy.... oh well.


I still haven't made my airship but I'll get around to it soon enough.

30 June 2013

More Hole Than Rope........


In my previous post I started to develop my understanding of a few different systems in Maya, n-cloth, n-hair and paint effects, and I enjoyed it soooo much that I felt like running a few more tests but this time with more rope..... so I made a net.

There's twenty six ropes in the net and four tether ropes.... that's a whole load of constraints (173 to be precise) but it didn't take too long to set up and I think the effect is pretty neat... Yes I could have simply used a texture on an n-cloth plane to create a net but that's not the point of this exercise, I wanted to learn more about n-hair and this allowed me to do just that.


It's easy to see that some of the ropes don't quite reach the edge of the net, I believe that this has something to do with the stretch attribute of the hair curves... Regardless that the net is impossible I rather like the sketchy look of it but will look into fixing things in my next investigations.

The video doesn't really do justice to the amount of detail that there is in the net ropes, I left the look of them pretty loose, kind of like they were fashioned by hand from jungle vines or something similar. Here's a close up of the net that also shows the PFX mesh towards the right of the image.....


Of course, converting PFX to geometry can make for a pretty heavy scene polygon-wise, in this case the net adds up to approximately 349000 faces but it is necessary as it's the only way that Mentalray can render the paint effects strokes... It's not always necessary to render in MR but I wanted to use final gather for self shadowing in this case.

I'm really loving the unpredictability of cloth and hair simulation and I'm understanding more and more about how it is possible to control the systems and how to avoid some of the issues that can arise through using them. So it's likely that I'll be posting more investigations in the future!

22 June 2013

Full of Hot Air......

I had an idea to create an inflating object so that's just what I did.... Being a dynamic simulation though it was never going to be as straight forward as I had hoped!

My initial idea was to have a tethered balloon inflate and then the tethers release and the balloon float off.... each part is simple enough but then there's the "C" word.... that's right, I'm talking about constraints. I discovered that n-cloth doesn't play too nicely with constraints on hair systems and the only work around appeared to be to set up the hair systems first which was a bit backwards really as the n-cloth was driving the hair.

Anyway, after a little jiggery pokery I got it to work in the end.....


For a first attempt I'm pretty pleased with it, there's issues with the tension on the guy ropes and the rope on the right isn't really behaving as it ought to at it's connection with the balloon but these are minor issues thatcan be ironed out as I continue to develop my understanding of the systems, the main thing is I have created a workflow that can produce results... happy days!


17 June 2013

I Can Haz Science....

I was speaking with the father of one of my daughters friends about physics and molecular astronomy.... as you do when you're waiting in the playground for your kid to go into school.... actually he was talking about it and I was standing there feeling every ounce of the intelligence I thought I had slipping away as I tried to follow his train of thought.

Anyway.... It got me to thinking I should try to make some kind of molecular animation, it's not something I've really tried before and it could look cool. I know it's not really at a molecular level but I know what mitosis is and thought it would be a good idea to start with something I know.

This the product of my efforts.....


The animation turned out pretty well and it was an interesting investigation, I had a play with various ideas including blend shapes and soft bodies but n-cloth worked really nicely in the end. I only ran one cellular split and used After Effects to comp the shot together.

14 June 2013

SIGGRAPH Elates Me....

The SIGGRAPH organisers have put a preview trailer For the Dailies presentations on the website and I'm chuffed to bits (slight understatement) to see that they've included my work in it.... That's right, my images are being used to advertise an event at the worlds foremost exhibition of computer graphics and interactive techniques...... crazy!


Having only read the call for submissions the day before the deadline, and thinking about it over the next day, I only decided a couple of hours before closing that I had nothing to lose by submitting my work and story for the consideration of the Dailies Jury.....

  • Devon Penney - Dreamworks
  • Hiromi Ono - Walt Disney Studios
  • Jerry Edsall - Microsoft Games
  • Robert Graff - Pixar Aniamtion studios 

I really wasn't convinced that more than a cursory glance would have been made at my work considering the heavy hitters that have appeared in the previous presentations that I had looked at.... Pixar and Dreamworks I'm looking at you!!..... but it turns out that my doubts were unfounded because the wonderful thing about Dailies is that it's about the story behind the work as much as, if not more, than the finished piece itself and that everyone from industry to individual has a chance to be part of the presentations.

I wouldn't be showing my work on a world stage like SIGGRAPH if I hadn't just bitten the bullet and hit the enter key on my submission. I can only recommend that if anyone reading this has doubts over whether they should enter their own work for any exhibition, they should just do it.... there really is nothing to lose and something wonderful may come of it.


8 June 2013

Further Adventures of the Particle People....

I've been playing with particles again, but this time in Maya rather than Realflow.

An ex-student of mine was having issues with particle goals and so, the charitable guy that I am, I helped him out and became interested in the potential for the effects that could be created using the workflow that I had developed for him.

This is a short clip that I made as an initial investigative test to loosely attach particles to a moving object......


I figured that it would be a bit more interesting to composite the effect to some live action rather than just show another proof of concept in the Maya workspace. It was was a very quick job that adds a bit more narrative to the effect and also allowed me to brush up on my tracking and compositing skills.

I'll certainly be developing my understanding of the particle systems in Maya and will post any interesting findings that I have when I have them.

24 May 2013

Fun With Phones......

It's been a few weeks since my last post... it's busy times again but all work and no play makes Mat a Dull boy so I set myself a quick technical exercise... model and render my headphones.

I know, if the subject was any more exciting and I could cause my self an injury right..... Ok, it was the first thing I picked up when I decided to set myself a task.

Anyway, modelling and rendering.... pretty straight forward really, I threw in a bit of Mudbox sculpting for the headphone pads but apart from that it was very quick, straight forward and fun.

It's nice to set yourself challenges every now and then, no pressure to get it done just zone out and enjoy the practice.

Here's some pictures....


A nice jaunty angle, I think I might have overdone the depth of field here but hey, I'm the client here and I'm happy with it!!


Close up of the label, I decided to use geometry for the badges rather than bump maps, it's worked out quite nicely really.


 Another close up, this time of the hinge, what's the point in adding detail if you don't render it eh!


I rather like this shot, it sort of looks like it belongs in an advert.

Anyway, that's that... I don't really feel as though I pushed myself with this little project but I did learn some stuff along the way. I definitely need to brush up on my composition skills and remember to adjust the depth of field on the rendering camera... or at least write a script to do it for me!!

1 May 2013

Fibionacci - Curves & Coding

I was asked by an artist friend if I could make a Fibionacci spiral that they could use in their 3D work or more precisely a button that when pressed would create one..... challenge accepted!


I'm no coder but I know a little MEL (Maya's native language) and I also like a good problem to solve so I set right to it by finding out the the equation for the Golden Spiral which turns out to be....

X(t) = sin(t*pi)*exp(t)
Y(t) = cos(t*pi)*exp(t)
Z(t) = exp(t)

I assumed X,Y and Z are translate coordinates and that t = time so I used the equation, where testLoc is the name of the locator, in an expression that I attached to a locator and it worked a treat.

testLoc.translateX = sin(time*3.14159)*exp(time);
testLoc.translateY = cos(time*3.14159)*exp(time);
testLoc.translateZ = exp(time);

I applied a motion trail to the locator to visualise it's path and was actually surprised a how well it had worked, figured the job was a good'un and that my artist friend would be happy making spirals until the cows came home. Unfortunately motion trails, while being an awesome animation tool, are not particularly useful for much else and so it was back to the drawing board.


I had a couple of otpions to choose from....

1 - The possibility of making a CV curve from the motion of an object that had the expression applied.
2 - Could I write a self contained script that would create a CV curve without the need for the expression.

I figured that the fewer steps that the end user had to consider to get the spiral would be the best option and so I decided to go for the self contained script rather than the expression/script combination that I believed the first option would entail.

The problem with scripting is that it isn't time based in the same way as expressions are. An expression will be calculated per frame as the animation plays whereas a script is considered when it is applied and not during playback. Being as time is a key element of the spiral equation I had to work out how to apply time in a script.

In a moving image sequence, time can be calculated by dividing the frame number by the frames per second and so using a loop, limited by the number of frames in the animation, to create an integer representing the frame number and querying the playback speed of the scene I was able to create a time value which I could apply to the spiral equation. That was the hardest part, the rest was pretty straight forward.

When run, the script initially creates a minimum value CV curve with four coordinates then queries the length of the animation and rebuilds the curve to have the same amount of control vertex as there are frames in the scene. The control vertex are then redistributed according to the spiral equation (with the calculated time) and Bob's your uncle, you've got a Fibionacci spiral shaped CV curve that you can use as a motion or extrude path in whatever cosmic animation you're planning to make.


Here's a link to the script, just copy and paste the text into Maya's script editor and execute it for spirally goodness. If you want to you could put a button on your custom shelf by selecting the text in the script editor and dragging it, while holding the middle mouse button, to the shelf, enjoy :)

CLICK FOR SCRIPT - Creative Crash

26 April 2013

Anaheim and me....

So, awesome news..... I got an e-mail from SIGGRAPH the other day congratulating me on the fact that my work had been selected to be presented in SIGGRAPH Dailies! at this years festival in Anaheim.  

SIGGRAPH Dailies! is quite new to the festival, I think that this is it's fourth year, and it is an opportunity to not only present your work but also the story behind it. Each presenter gets up to one and a half minutes to tell the story behind the creation of their work and then it's onto the next person, sort of like speed dating I suppose. This year they are allowing presenters to record their presentation if they are unable to attend in person.

I was over the moon when I received the e-mail from Mark Elendt from Side Effects Software who is chair of the selection committee and then I read the bit where I was expected to be there to be there to present. My heart sank, I was certain that I had selected that I would not be able to attend on my submission but when I reviewed it I hadn't changed it from "I will attend"..... what to do?

-Promotional still from Shadow & Light-

I was worried that my selection into the festival hinged on the fact that I would be there to present, if I mailed them to say otherwise would they retract their decision to allow my work to be shown?

Anyway, I mailed Mark letting him know that I had made a mistake on the submission form and that I wouldn't be able to present in person, with my fingers crossed I waited for the response.....

Mark replied very quickly considering the time difference between Sheffield and Anaheim and said that the story behind my work was great and that they are looking forward to receiving my recorded Submission.... Phew!

It's funny that after many years of wanting to attend SIGGRAPH but never being able to afford it, I have never even considered that I might one day be able to present my work there but here I am, presenting at this years exhibition and still not being able to get there!!

Here's a bit more about SIGGRAPH Dailies! from last years chair.....


29 March 2013

Even the Rubber Ducks Are Leaving...

Here's another snowy video.......


Even the rubber ducks are trying to find somewhere warmer to be this spring!!

I made this as a quick compositing exercise. It was interesting to experiment with ways to get the ducks floating and in the end I opted to use the Maya ocean tool and I turned each duck into a boat object which constrained the X and Z rotation as well as the translate Y but still allowed me to animate the X and Z translation and Y rotation of the ducks enabling me to make them appear to float in the right direction with a fairly natural bobbing motion.

I like the effect, it's not perfect in this video but I've created a neat workflow for myself now which I will be able to apply much more effectively in the future.

23 March 2013

Snow Joke, It's Spring!!

It's March 23rd, spring is officially here so what better way to spend the morning than to traipse around the valley in 8 inches of unexpected snow?

I went out with an idea to shoot some footage for a project that I'd like to make but it was so cold and the fact that my camera was getting wet (note to self, get some sort of camera umbrella!) made me cut the excursion short but not without grabbing a few scenes to play with today.....


I figured that walking backwards and then playing the video forwards would make for a pretty neat effect... and it does. This video is what I was able to create with a few minutes of impromptu shooting and I reckon that with a chunk of pre-production planning I'll be able to come up with something pretty nice.

Maybe when the weather gets a bit better eh!!


4 March 2013

Kinetica-tastic

Apologies for how quiet it's been around here since December.

Amongst other things an operation on my knee stopped me from sitting at my computer for a few weeks but things are better now and the creative juices are flowing!

So, I went to Kinetica Art Fair last weekend and shot this video......


I used my trusty Nex 5N but only took the 18-55 kit lens which is a good all rounder but, at f2.8, was no where near fast enough to deal with the poor lighting conditions. In future I'll have to make sure to take at least one fast prime lens with me on any trip that I intend to record.

The main reason for going to Kinetica was to meet up with a Dutch artist called Rob Hermans who goes by the name IEOIE. For the past 7 years or so, I have acted as technical director for all of his 3D video work and we were presenting a collaborative piece on the Musion stage at the fair.

Musion Systems are a modern take on the peppers ghost illusion that has regained popularity in recent years at entertainment events through the impression that it gives of holographic projection. It was really great to see our creation effectively floating in space on their stage and it has certainly inspired ideas for future projects of my own and with Rob.